Currently I have 4 servers in my environment
1- Domain controller running on Windows 2003 (Domain Name -
RADIUSDC1.com)
2 – I have two XenDesktop/XenApp
7.6 server Windows 2008 R2, All the roles running on one servers except
database like Delivery controller, Studio, License server, Director and
Storefront. ( Server name – XENAPP and XENAPP2) and second server have Virtual
desktop Agent .
3 - SQL 2014 Standard edition Database server running on Windows 2012 R2
(Server name - SQL1)
In order to create SQL mirroring I installed 2 more SQL
Database server on windows 2012 R2 and their names are SQL2 and SQL4 , one for
mirroring and another as Witness server.
The Witness SQL server can run SQL Server Express but I
already had full SQL Server installed on the other servers .
On all the 3 database server MSSQL service is running with
Domain administrator account RADIUSDC1\Administrator
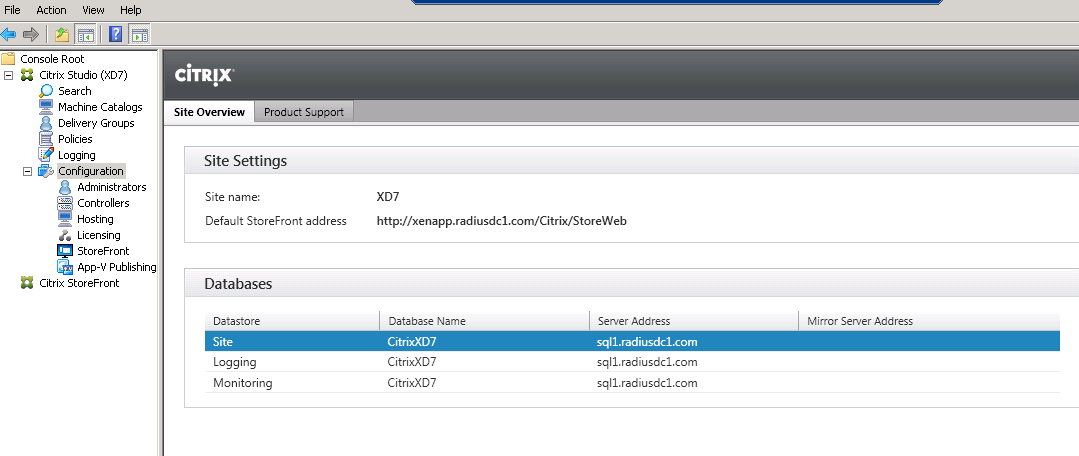
When I created my Site, I allowed Studio to create and
configure the Site database. The Site configuration, Configuration
Logging and Monitoring are all using the same database.
First, let’s have a look at the existing database connection
strings. On the DDC, launch a Powershell Session and add the XenDesktop PoSH
Snapins

View the existing database connection strings for the three XenDesktop datastores [Site, Logging & Monitoring]:

We can see here that the main site, logging and monitoring datastores are all using the same database on the same SQL server. This is normal and is the default configuration for a XenDesktop site.
Note: The locations of the three datastores can also be viewed in the Desktop Studio console on the Configuration node as shown below.
Before mirroring the database, stop configuration Logging:
##Disable
Configuration Logging
From GUI - Logging >
Preferences > Disable.

-Or-
In PowerShell, run:
Set-LogSite -State "Disabled"

Close Citrix Studio and reopen so the PowerShell command can take effect.
Stop
Monitoring
In PowerShell, run:
Set-MonitorConfiguration -DataCollectionEnabled $False

The first thing that must be done is to change the Recovery model of the database that Studio created automatically. Studio created the database using the Simple Recovery model but mirroring requires the use of the Full Recovery model.
“The database must use the full recovery model. The simple and bulk-logged recovery models do not support database mirroring. Therefore, bulk operations are always fully logged for a mirrored database.”
On the SQL Server that has the Site database, open the SQL Server Management Studio, expand Databases, right-click the Site database, click Properties and click Options in the left pane.

Change the Recovery model to Full and click OK.

Now to start configuring the database to be mirrored.
Next step is to do two backups of the Site database. One for the database and one for the transaction logs.
Still in the Databases node of the SQL Server Management Studio, right-click the Site database, click Tasks and click Back Up.

Leave the Backup type as Full and click OK.

Click OK.

Repeat the process for the second backup. Right-click the Site database, click Tasks and click Back Up.
Change the Backup type to Transaction Log and click OK.

Click OK.

The backup on the primary SQL server needs to be copied to the same location on what will be the mirror SQL server. For my lab, SQL1 is the primary and SQL2 is the mirror.
What I did is on SQL1 open up Windows explorer to C:\Program Files\Microsoft SQL Server\MSSQL12.MSSQLSERVER\MSSQL\Backup and also open up an Explorer window to \\sql2\c$\Program Files\Microsoft SQL Server\MSSQL12.MSSQLSERVER\MSSQL\Backup I then copied and pasted the backup file from SQL1 to SQL2.

Exit both explorer windows.
Either go to SQL2 or add SQL2 to the SQL Server Management Studio on SQL1 (which is what I did).
Note: Please make sure your SQL Servers are running the same version or you will run into issues.

For the mirror server connection (SQL2 for me), right-click Databases and click Restore Database.

Change Source to Device and click the browse button.

Click Add

Browse to the backup file copied from the secondary SQL server (SQL2), click on the backup file and click OK.

Click OK.

Make sure the Database is your Site database and both Backup sets to restore are selected. DO NOT click OK at this time.

Click Options in the left pane, change the Recovery state to RESTORE WITH NORECOVERY and click OK.

Click OK.

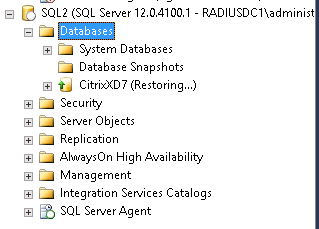
Expand Databases on the
mirror server. The Site database should say “(Restoring…)“.
On the principal server, expand Databases, right-click the Site database, click Tasks and click Mirror.

Click Configure Security.

Verify Yes is selected and click Next.

Verify Witness server instance is selected and click Next.

Click Next

Select the mirror server from the Mirror server instance dropdown and click Connect.

Click Connect to authenticate and connect to the mirror server (SQL2).

Click Next.
Select the witness server from the Witness server instance dropdown and click Connect.

Click Connect to authenticate and connect to the witness server.

Click Next.

Enter the SQLServers security account for all three instances and click Next.

Click Finish.

If all Action columns have a status of success, click Close. Otherwise, view the report generated, resolve the issues reported and rerun the Configure Security wizard.

Click Start Mirroring

it worked. Click OK.

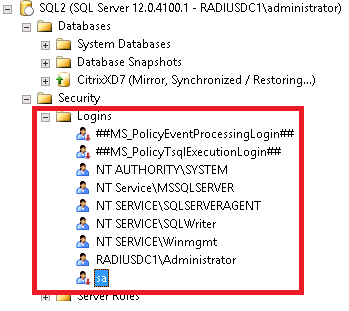
In the SQL Server Management Studio, refresh the primary and mirror servers. Expand Databases on both servers. The principal server should show the Site database as (Principal, Synchronized) and the mirror server should show the Site database as (Mirror, Synchronized / Restoring…).

Now do a basic test of the failover before continuing.

Click the Failover button.

Click Yes.

Refresh both the principal and mirror servers, expand Databases and look at the database status.
The principal server now shows (Mirror, Synchronized / Restoring…) and the mirror server now shows (Principal, Synchronized).

Faliover Back to SQL1

When Studio created the Site database it added the Controllers computer account as a login account on the SQL server. When others Controllers are added to the Site, Studio asks if you want the Site database updated. If the answer is Yes then Studio adds the new Controller as a login account on the SQL server.
Here is my principal SQL server’s login account.

Here is my mirror SQL server’s login accounts after the database is restored, mirroring configured and failed over.
Creating a Delivery Controller SQL Login
Complete the following procedure to create machine logins for all Delivery Controllers (Controllers) on the database server:Select SQL Server Management Studio SQL2 and click on New Query

Run the create login [domain\machine$] from windows query, as displayed in the following screen shot and click Execute

Select SQL2 and Click refresh
Check machine account created for controller

Each Delivery Controllers Machine Login should have a corresponding user account under the restored Database.
Failover to SQL2

Each Delivery Controllers Machine Login should have a corresponding user account under the restored Database. Locate these accounts and verify that their Database role membership is set to the following role, as displayed in the screen shot:
Right click the account created and click properties
ROLE
|
Account
(one for each Broker)
|
ADIdentitySchema_ROLE
|
DOMAIN\MACHINE$
|
chr_Broker
|
DOMAIN\MACHINE$
|
chr_Controller
|
DOMAIN\MACHINE$
|
ConfigLoggingSchema_ROLE
|
DOMAIN\MACHINE$
|
ConfigLoggingSiteSchema_ROLE
|
DOMAIN\MACHINE$
|
ConfigurationSchema_ROLE
|
DOMAIN\MACHINE$
|
DAS_ROLE
|
DOMAIN\MACHINE$
|
DesktopUpdateManagerSchema_ROLE
|
DOMAIN\MACHINE$
|
EnvTestServiceSchema_ROLE
|
DOMAIN\MACHINE$
|
HostingUnitServiceSchema_ROLE
|
DOMAIN\MACHINE$
|
Monitor_ROLE
|
DOMAIN\MACHINE$
|
MonitorData_ROLE
|
DOMAIN\MACHINE$
|
StorefrontSchema_ROLE
|
DOMAIN\MACHINE$
|


Test Mirror Database
Login Back to the controller and run the below mentioned commands from each controller.My controller name is “Xenapp” and Primary database is on SQL2.
Replace dbserver with “SQL2.radiusdc1.com” and dbname with “CitrixXD7”
From Each Controller, test the database connection string before making changes:
IMPORTANT NOTE: Test-AnalyticsDBConnection -DBConnection is for 7.6 and later.
##
## Replace <dbserver> with the New SQL server, and instance if present
## Replace <dbname> with the name of your restored Database
##
##
$ServerName="<dbserver>"
$DBName ="<dbname>"
#
$cs="Server=$ServerName; Initial Catalog=$DBName; Integrated Security=True"
$cs
Test-AdminDBConnection -DBConnection $cs
Test-ConfigDBConnection -DBConnection $cs
Test-AcctDBConnection -DBConnection $cs
Test-AnalyticsDBConnection -DBConnection $cs
Test-HypDBConnection -DBConnection $cs
Test-ProvDBConnection -DBConnection $cs
Test-BrokerDBConnection -DBConnection $cs
Test-EnvTestDBConnection -DBConnection $cs
Test-LogDBConnection -DBConnection $cs
Test-MonitorDBConnection -DBConnection $cs
Test-SfDBConnection -DBConnection $cs


This confirm SQL2 database is working fine.
Now failover back to SQL1

Remove the existing Database connections:
IMPORTANT! Set-AnalyticsDBConnection -DBConnection entry is for XenDesktop 7.6 and later.
At the Delivery Controllers, from the open PowerShell window, run the following commands where <dbserver> is the name of your Primary SQL server and <dbserver2> is the name of your Mirror SQL server, which is the instance if defined and <dbname> is the name of the XenDesktop database.
This process clears the existing database connection and then configures the new connection for each service:
NOTE- Run below mentioned command from all controller , I just have one controller.
##
## First unregister the Delivery Controllers from the current database:
##
Set-ConfigDBConnection -DBConnection $null
Set-AcctDBConnection -DBConnection $null
Set-AnalyticsDBConnection -DBConnection $null
Set-HypDBConnection -DBConnection $null
Set-ProvDBConnection -DBConnection $null
Set-BrokerDBConnection -DBConnection $null
Set-EnvTestDBConnection -DBConnection $null
Set-SfDBConnection -DBConnection $null
Set-MonitorDBConnection -DataStore Monitor -DBConnection $null
Set-MonitorDBConnection -DBConnection $null
Set-LogDBConnection -DataStore Logging -DBConnection $null
Set-LogDBConnection -DBConnection $null
Set-AdminDBConnection -DBConnection $null


Set-AdminDBConnection -DBConnection $null Show error message
Run again with force parameter
Set-AdminDBConnection -DBConnection $null –force

A new connection string is needed to configure XenDesktop for mirroring.
"Data Source=<dbserver>; Failover Partner=<dbserver2>; Initial Catalog=CitrixXD7; Integrated Security=True"
For my lab, that becomes ‘Server=SQL1; Failover Partner=SQL2; Initial Catalog= CitrixXD7; Integrated Security=True’
Run the below mentioned commands from each controller
IMPORTANT NOTE: Set-AnalyticsDBConnection -DBConnection is for 7.6
and later.
$cs = "Data Source=<dbserver>; Failover Partner=<dbserver2>; Initial Catalog=CitrixXD7; Integrated Security=True"
$cs
Set-AdminDBConnection -DBConnection $cs
Set-ConfigDBConnection -DBConnection $cs
Set-AcctDBConnection -DBConnection $cs
Set-AnalyticsDBConnection -DBConnection $cs
Set-HypDBConnection -DBConnection $cs
Set-ProvDBConnection -DBConnection $cs
#Set-PvsVmDBConnection -DBConnection $cs
Set-BrokerDBConnection -DBConnection $cs
Set-EnvTestDBConnection -DBConnection $cs
Set-LogDBConnection -DBConnection $cs
Set-LogDBConnection -DataStore Logging -DBConnection $null
Set-LogDBConnection -DBConnection $null
Set-LogDBConnection -DBConnection $cs
Set-LogDBConnection -DataStore Logging -DBConnection $cs
Set-MonitorDBConnection -DBConnection $cs
Set-MonitorDBConnection -DataStore Monitor -DBConnection $null
Set-MonitorDBConnection -DBConnection $null
Set-MonitorDBConnection -DBConnection $cs
Set-MonitorDBConnection -DataStore Monitor -DBConnection $cs
Set-SfDBConnection -DBConnection $cs


Note: It is important to verify that all the preceding Set-<service>DBConnection commands have returned a result of OK. In case, when the result is other than OK for any of these commands, it might be necessary to enable logging or tracing to determine the cause of the connection failure.
#Set-PvsVmDBConnection -DBConnection $cs command does not exist in version 7.x. In version 5.6, it exists but the # would needs to be removed.
enable Monitoring and Logging:##Enable Monitoring
Set-MonitorConfiguration -DataCollectionEnabled $true

##Enable Configuration Logging
Set-LogSite -State "Enabled"
Now Open Studio and check configuration

From each Controller, test the database connection services
Get-AcctServiceStatus
Get-AdminServiceStatus
Get-BrokerServiceStatus
Get-ConfigServiceStatus
Get-EnvTestServiceStatus
Get-HypServiceStatus
Get-LogServiceStatus
Get-MonitorServiceStatus
Get-ProvServiceStatus
Get-SfServiceStatus

